Caffe latte, translated directly, is just coffee and milk. Originally, it was made only at home and consumed only at breakfast. But looking at the menu at your local Starbucks, you’d be hard pressed to identify its humble beginnings. The caramel brulée lattes, seasonal-spice-du–jour lattes and everything in between are variations (some may say bastardizations) of the espresso-based drink.
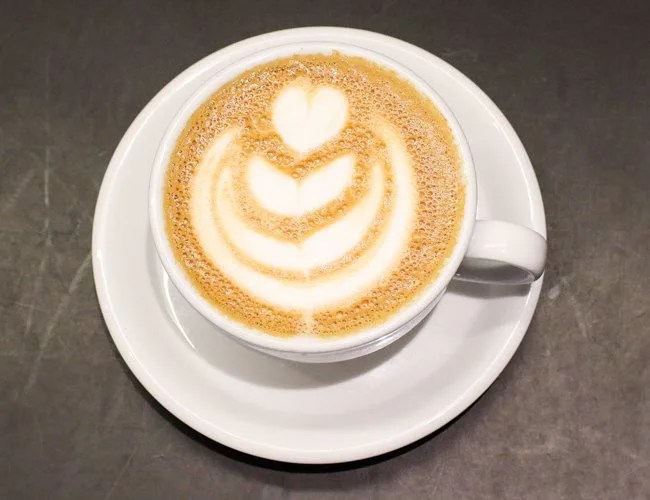
For those who believe that a latte tastes best in its simplest form, but still want to enhance their morning caffeine experience, “latte art” is the purer way to spice up the cup. Carlos Morales, latte artist and director of coffee at Third Rail Coffee, showed us how to properly prepare a latte-canvas and the simple gestures it takes to create whimsical designs, from the basic “Heart” to his take on the “Rosetta.”
Prep Your Latte: Pour the whole milk into the pitcher so it’s ready to steam as you pull your espresso. For proper steaming technique, see here. As your espresso shot starts extracting, steam your milk. By the time your espresso is done, the milk should be done as well. Just before you pour, give the cup of espresso a tap on the counter, then do the same with the milk. This will release any excess air bubbles and let the two liquids homogenize. Finally, pour the milk, as delineated below.
The Heart
1. Tilt the cup and start to add milk to the center of your espresso to incorporate the two.
2. With a steady pour of milk, gently and slowly begin straightening the cup.
3. Once the milk shape in the center of the mug is about the size of a half dollar, gradually ease up on your pour and start to cut across the center. This will crease the shape and form the heart.
The Tulip
1. Tilt the cup and start to add milk to the center of the cup, much like the Heart.
2. With a steady pour of milk, gently move the pitcher back and forth to spread the milk out, slowly straightening the cup as you go. Stop pouring altogether once you have a half-dollar-sized shape in the middle.
3. Then, with a steady pour and a forward motion, from one side of the cup to slightly past center, you’ll create a “second tier.” Repeat this motion three or four times.
4. With a light pour and a thin stream from the pitcher, perform the “cut-through” by dragging the milk down the middle of the shapes forming the petals and stem of the Tulip.
The Rosetta
1. Much like how the Heart starts out, initially pour the milk with the cup tilted.
2. As you straighten the cup, wiggle the pitcher back and forth in a zigzag pattern. This creates and spreads out the tiers of the Rosetta.
3. Once you get to the top, recreate a Heart, and continue the cut-through all the way across. This is what creates all the stems and leaves of the Rosetta.
Carlos’s Tulip
1. Tilt the cup and start to add milk to the center of the cup, exactly like the Tulip.
2. With a steady pour of milk, quickly move the pitcher back and forth to build more tightly packed tiers.
3. Slowly straightening the cup as you go, add a small extra dollop at the bottom, then stop pouring.
4. Recreate a small Heart at the top, and then continue the cut-through all the way to the bottom.
About Our Expert
Carlos Morales, director of coffee at Third Rail Coffee’s Second Ave location. At Third Rail, they use a La Marzocco GB5 machine and a Mazzer grinder.