How to Become a Gmail Master

You can send emails that self-destruct, Snapchat style.

Gmail-Master-gear-patrol-full-lead

The popularity of Gmail is undeniable. Google’s free email service has over a billion active users, all of whom can take advantage of Gmail’s simple interface, cross-integration with other Google platforms (like Google Drive, Calendar and Google Photos), and 15GB of free online storage. That said, most active users could probably take advantage of more. Or, at the very least, use Gmail a little more efficiently. Here’s how.

Send emails and clean out your inbox, simultaneously

gear-patrol-gmail-master-sendarchive-ambiance

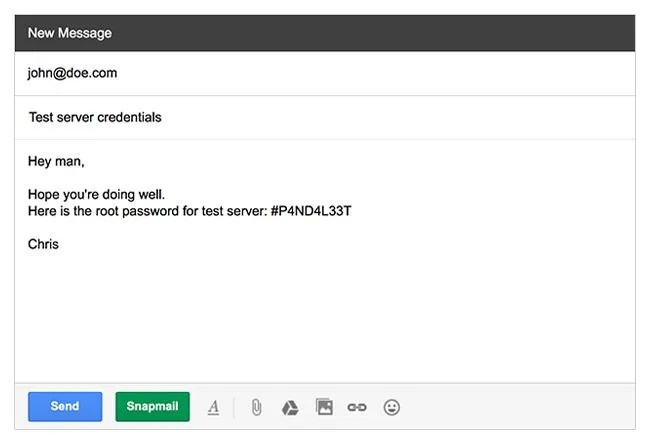
If you have “keyboard shortcuts” turned on, you probably know that you can instantly archive your emails by pressing “e” after you send them. You can click on the emails in your Inbox and press “e” to archive them, too. If you want to simplify things even further, we recommend creating a “Send and Archive” button that automatically archives the emails when you send, forward and reply.

  • In Gmail, click the Settings (gear icon) in the top-right corner.
  • Click Settings.
  • In the General tab, select “Show ‘Send & Archive’ button in reply” in the “Send and Archive:” section.
  • Click Save Changes.
  • The next time you want to send an email, compose it and then click the “Send and archive” button instead of the “Send” button.

    See more with a preview pane

    gear-patrol-gmail-master-preview-pane-ambiance

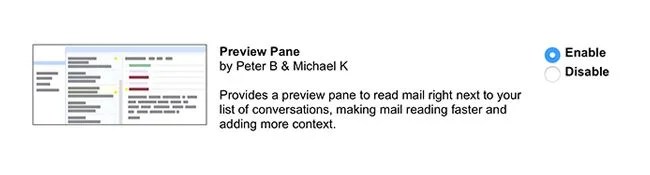
    A common complaint with Gmail is that you can’t see enough. When you open an email, you can’t see the rest of your Inbox without having to exit the email first. Enabling a preview pane is an easy way to fix that. It’ll help you read and answer emails more efficiently. You might question how you ever survived without a preview pane in the first place.

  • In Gmail, click Settings (gear icon) in the top right corner.
  • Click Settings.
  • In the Labs tab, make sure that “Preview Pane” is enabled.
  • Click Save Changes.
  • Afterward, you can customize your preview pane to split horizontally or vertically, and how much of the Inbox window it takes up. To customize, go to the pane button next to the Settings gear icon in Gmail.

    Undo sent emails

    gear-patrol-gmail-master-undosend-ambiance

    How many times have you accidentally sent an email that wasn’t ready and had typos? Fortunately, Gmail has a feature that allows you a purgatory period to undo send or cancel an email. It’s only a few seconds, but it could sure come in handy.

  • In Gmail, click Settings (gear icon) in the top right corner.
  • Click Settings.
  • In the General tab, check the box that says “Enable Undo Send” in the “Undo Send:” section.
  • Click Save Changes.
  • Under “Enable Undo Send” you will see an option to adjust the cancellation period. Your options are 5, 10, 20 and 30 seconds. This means that the email won’t be sent until the allotted time has past.

    Send emails that will self-destruct

    gear-patrol-gmail-master-snapmail-ambiance

    If you’re using Gmail on a Chrome browser, Snapmail enables you to send self-destructing emails — emails that automatically delete when somebody reads them (think Snapchat). Snapmail is a chrome extension that adds another button to your Gmail alongside “Send.” Once installed, instead of sending an email, you’ll have the option to send a Snapmail instead. Once opened, the reader will have 60 seconds to read before it’s destroyed.

  • Go to Snapmail.
  • Click the “Download” button in the top-right corner.
  • In the new Window, click the “+ Add to Chrome” button.
  • Exit out of Snapmail and, in a new Chrome tab, click the three vertical dots in the top-right corner.
  • Click “More Tools” and then click “Extensions.”
  • Make sure the Snapmail box is checked.
  • The next time you try to compose and send an email in Chrome, you should see the Snapmail button. If not, refresh your Chrome browser.

    Easily find big emails — delete them for additional storage

    Google gives all its users 15GB of free online storage, but this is split between Gmail, Google Drive and Google Photos. Basically, 15GB won’t go as far as you think. If you’re maxing out on Gmail storage, you can use “Find Big Mail” to find all the email sucking up your storage with huge attachments

  • Go to Find Big Mail’s website, click “Add to Chrome” and then “Add App.”
  • Click on the Find Big Mail app in Chrome, and click on “Start.” You’ll be prompted to select which Gmail account you want scanned.
  • After selecting your Gmail account, you’ll need to click the “Allow” button to give the app the ability to “view and modify but not delete your email.”
  • Wait for the app to scan your emails. It should take a few minutes.
  • The app will create Gmail labels, sorting emails that are larger than 5MB and 10MB, and final label of your “Top 20” biggest emails.
  • Go into each label (located in the left column of your Gmail) and delete the emails you don’t need.
  • Find Big Mail is a free app, although it encourages users to donate to cover its monthly running costs. It’s worth noting that after deleting the emails, the storage won’t free up immediately unless you empty your Trash using “Delete Forever.” Typically, emails stay in your Trash for 30 days before being deleting permanently.

    Gmail offline lets you manage email, sans wi-fi

    Normally, without a wi-fi connection, you aren’t able to read, delete or scroll through emails on your laptop. That changes when you enable Gmail’s “Gmail Offline” feature. Once enabled, you can do all those things, and even respond to emails without a wi-fi connection. This feature is a godsend if you travel for work and can’t depend on a consistent internet connection.

  • In Gmail, click Settings (gear icon) in the top right corner.
  • Click Settings.
  • In the “Offline” tab, click “Install Gmail Offline.”
  • In the next window, click “Add to Chrome.” Then click “Add App.”
  • Click the “Gmail Offline” app. Select the “Allow offline mail” option.
  • To access Gmail when offline, open Chrome and visit chrome://apps/.
  • Technically, you’re not responding, reading and deleting and emails while offline — you’re just queuing them up so that when you get a wi-fi connection again, all those Gmail actions will be carried out. Also, Gmail Offline will only keep seven days’ worth of email available to you. If you wish to see more emails, you need to change this in Settings.

    Draft fewer emails with canned responses

    gear-patrol-gmail-master-canned-7-ambiance

    If you send a lot of emails that effectively say the same thing, with a few tweaks, you can save template emails, which Gmail calls “canned responses.” You’ll find that these pre-drafted emails will end up saving you time, a lot of it.

  • In Gmail, click Settings (gear icon) in the top right corner.
  • In the “Labs” tab, make sure that “Canned Responses” are enabled.
  • Click “Compose” to create a new email.
  • In the bottom right corner of the “New Message” window, click on the triangle. Then click the option for “Canned Responses.”
  • If you’ve already drafted canned responses, you can access them here. You can create new canned responses by selecting the “New canned response” option.
  • Instead of sending mass emails to many bcc’d recipients, canned emails give the sender the ability to customize. No more going into the “Sent Mail” folder, copying and pasting text into a new email, then tweaking it all slightly before sending. For example, if you have a generic three-paragraph email that you want to send to ten people, but you want to address each recipient by name, the canned responses tool enables you to send all those emails in a few seconds.

    Advertisement - Continue Reading Below
    More From Apps